
Welcome to the deep end of the DIY pool. You aren’t here because you want the easiest way to power your toaster; if you did, you’d just click "buy" on a mass-produced panel from Amazon or eBay. You are here because you want to understand the magic. You want to hold a slice of silicon in your hand, weld a wire to it, and watch it turn sunlight into lightning.
Building a solar panel from scratch is one of the most satisfying science projects you can undertake. It’s equal parts chemistry, electrical engineering, and arts-and-crafts. It teaches you exactly how renewable energy works, down to the atomic level. But let’s be real for a second: in 2026, this is largely a labor of love. Commercial factories have robots that can spit out panels cheaper than you can buy the raw glass1. You are doing this for the knowledge, for the ability to build custom sizes for weird spaces, or maybe just to say, "I made that."
This guide is going to be exhaustive. We aren’t just going to tell you to "solder the wire." We are going to tell you exactly how to hold the iron, what the smoke should smell like, and why your first three attempts will probably crack. We’ll talk about the physics of silicon, the chemistry of the glue, and the geometry of the frame. We’ll keep it simple, direct, and safe.
The "Too Long; Didn't Read" (TL;DR) Summary
If you are standing in your garage with a soldering iron in one hand and a confused look on your face, here is the cheat sheet:
- The Cell: You are using monocrystalline silicon cells. They are blue/black and extremely fragile.
- The Connection: You need to solder flat tabbing wire to the front (negative) of one cell and connect it to the back (positive) of the next cell. This is a "series" connection.
- The Math: Each cell pushes about 0.5 volts. To charge a 12V car battery, you need 36 cells connected in a chain (0.5V x 36 = 18V). 18 volts is the pressure needed to push energy into a 12V battery.
- The Sandwich: You can’t leave cells exposed. You must glue them to tempered, low-iron glass using a UV-resistant encapsulant (like liquid silicone or specialized resin).
- The Trap: Most people fail at the encapsulation stage. If you use cheap glue, it bubbles. If you don't seal the edges, water gets in and kills it.
- The Safety: Silicon shards are sharp. Soldering fumes are toxic. Lead is poisonous. Wear gloves and safety glasses, and open a window3.
---
2. The Science of Sand and Sun (A Crash Course)
Before we buy anything, we need to understand what we are handling. A solar cell is essentially a sophisticated rock. It is made of silicon, which is the main ingredient in sand.
The Silicon Wafer: A Fragile Trap for Light
When you buy a "kit" of solar cells, you are buying thin wafers of silicon crystal. These wafers have been "doped" with chemicals. One side has too many electrons (N-type), and the other side has holes where electrons should be (P-type).
When a photon (a particle of light) smashes into the silicon, it knocks an electron loose. Because of the chemical doping, that electron can only move in one direction. It’s like a turnstile. The electron wants to get back to its hole, but it can’t go backwards. It has to travel out through the wire, go through your battery or lightbulb, and come back in through the other side. That flow of electrons is electricity.
Monocrystalline vs. Polycrystalline: The Coke vs. Pepsi Debate
You will see two main types of raw cells for sale.
- Monocrystalline (Mono): These are black or dark blue and usually have clipped corners, making them look like octagons. They are cut from a single, perfect crystal of silicon. They are more efficient (meaning they make more power from the same amount of sunlight) and work better in hot weather. In 2026, these are the standard4.
- Polycrystalline (Poly): These look like blue shattered glass or a disco floor. They are made from melted fragments of silicon. They are slightly less efficient and don't like heat as much. You might find these cheap on the surplus market, and they are great for practicing because you won't cry as much when you break one4.
Recommendation: Go with Monocrystalline. The price difference has mostly vanished, and they are simply better performers.
The Voltage Rule
Here is a law of physics you cannot change: One silicon solar cell produces about 0.5 to 0.6 volts.
It doesn't matter if the cell is the size of a fingernail or a dinner plate. The voltage (pressure) is determined by the chemistry. The amperage (volume of flow) is determined by the size of the cell.
- Big Cell = 0.5 Volts, High Amps.
- Small Cell = 0.5 Volts, Low Amps.
To do anything useful, like charge a 12-volt battery, we need to stack that pressure. By connecting cells in a chain (series), we add the voltage up.
- 1 Cell = 0.5V
- 2 Cells = 1.0V
- ...
- 36 Cells = 18.0V
Why 18 volts for a 12-volt battery? Because you need higher pressure to push energy into the battery. If your panel only made 12 volts, it wouldn't push anything into a 12V battery. It would just sit there. The extra voltage (18-21V) allows for voltage drop in the wires and ensures charging happens even on cloudy days5.
---
3. The Shopping List of Destiny
This is where projects live or die. If you buy the wrong flux, your solder won't stick. If you buy the wrong glass, your panel will produce half the power. Let’s break down exactly what you need.
The "Must-Haves"
1. Solar Cells (The Raw Material)
You want to buy a "Solar Cell Kit." These are widely available on sites like eBay or specialized solar DIY stores.
- Quantity: You need 36 cells for a standard panel. Buy at least 40 or 50. You will break some. It is a rite of passage. If you don't break at least three, you aren't trying hard enough8.
- Grade: You will see "Grade A" and "Grade B." Grade B cells might have cosmetic blemishes or tiny chips, but they are much cheaper and work fine for DIY.
- Pre-Tabbed vs. Untabbed:
- Untabbed: Just the raw silicon. You have to do all the soldering. This is the "hard mode" and what we will cover in this guide because it teaches you the most.
- Pre-Tabbed: Someone (or a machine) has already soldered the front wires on. This saves you 50% of the work and reduces breakage risk. If you are nervous, buy pre-tabbed10.
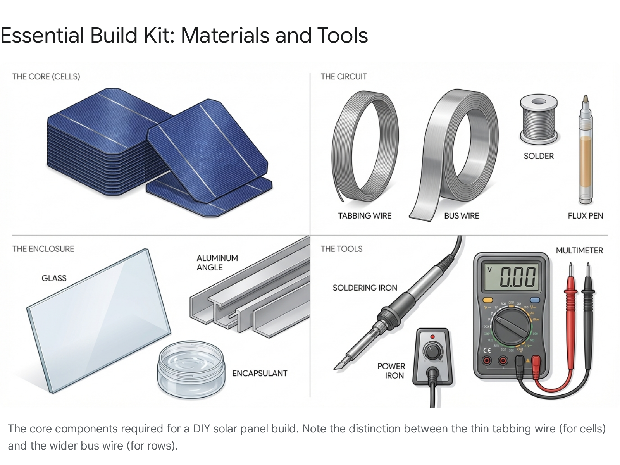
2. Tabbing Wire (The Collector)
This is a flat, thin copper ribbon that runs across the face of the cell. It is usually about 1.5mm to 2mm wide.
- Crucial Detail: Ensure it is "Pre-tinned" or "Solder coated." This means it already has a layer of solder on it, making it much easier to stick to the cell11.
3. Bus Wire (The Highway)
This is the wider flat wire (usually 5mm). It connects the rows of cells together. It carries more current, so it needs to be thicker11.
4. The Flux Pen (The Secret Sauce)
You cannot solder solar cells without flux. Period. The surface of the cell oxidizes instantly in air. Flux is a chemical cleaner that removes that oxide layer right before the solder hits.
- Type: Get a Rosin Flux Pen (like Kester 951 or similar). It is non-corrosive. Do not use acid flux (like for plumbing); it will eat your connections over time and destroy the panel14.
5. Solder
- Type: 60/40 Lead-Tin solder is the easiest to use. It melts at a lower temperature and flows smoothly.
- Safety: Lead is toxic. Don't eat it. Don't breathe the fumes. Wash your hands.
- Alternative: Lead-free solder (Silver/Tin) is safer but harder to work with (requires higher heat, which risks cracking the cells). For beginners, 60/40 is often recommended for the ease of use, provided you are safe10.
6. The Substrate (Glass)
This is the backing board.
- The Gold Standard: Low-Iron Tempered Glass. Standard window glass has iron in it (look at the edge; if it's green, it has iron). Iron blocks sunlight. Low-iron glass is ultra-clear. Tempered glass is strong and heat-resistant.
- The "I'm on a Budget" Option: Regular window glass (double strength). It works, but you lose efficiency and it breaks dangerously.
- The "Please Don't" Option: Plexiglass or Acrylic. It scratches. It warps in the heat. UV light turns it yellow and brittle in two years. It ends up being a waste of money17.
7. Encapsulant (The Glue)
You need to seal the cells to the glass.
- Pro: Sylgard 184 or generic Solar Encapsulant (QSil 216). It's a two-part liquid rubber. Expensive but lasts 20 years20.
- Budget: Clear Silicone Caulk mixed with Mineral Spirits (we will discuss this "hacker" method later).
---
4. The Danger Zone: Handling Raw Cells
Before we even plug in the soldering iron, we need to talk about "The Crunch." That is the sound a solar cell makes when you break it. It is a heartbreaking sound.
Solar cells are approximately the thickness of a piece of cardstock, but they are made of crystal. They have zero flexibility. If you pick one up by the corner and wiggle it, it will snap. If you press too hard with the soldering iron, snap. If you leave a tiny bead of solder on the table and put the cell on top of it, snap.
The Rules of Engagement
- The Clean Room: Clear your table. Wipe it down. A single crumb of bread is enough to act as a fulcrum and crack a cell when you press on it.
- The Touch: Handle cells by the edges, using two hands if possible. Think of them as potato chips made of glass.
- The Surface: Work on a flat, smooth surface. A sheet of glass or a dedicated silicone soldering mat is ideal. Some people tape a piece of smooth paper to the table to work on.
- No Stacking: Don't stack heavy things on them. Don't drop them.
- Ventilation: Soldering creates fumes (rosin smoke and potentially lead vapor). You need airflow. A small fan blowing the smoke away from your face is good3.
---
5. The Art of the Solder: Tabbing the Cells
This is the hardest part of the project. If you master this, the rest is easy. If you rush this, your panel will fail.
The goal is to attach the thin tabbing wire to the front of the cell. The front is the negative side. It usually has two or three thick white/silver lines running down it (called busbars). The tabbing wire goes right on top of these lines.
Step-by-Step Tabbing
Step 1: Measuring and Cutting
You need to cut your tabbing wire to length.
- The Math: Length of cell (e.g., 6 inches) + Spacing (0.1 inch) + Length to reach the back of the next cell (3 inches).
- Result: For a standard 6x6 cell, cut your wires to about 9 to 10 inches. You need two wires per cell.
- Pro Tip: Cut all 72 wires (for a 36-cell panel) at once. It saves time later3.
Step 2: Fluxing
Take your flux pen and draw a line right down the silver busbar on the cell. You don't need to press hard, just wet it.
- Why? The flux strips the invisible oxidation off the silver. If you skip this, the solder will just ball up and roll away like mercury. It won't stick14.
Step 3: The "Swipe" Technique
This is the specific motion used by pros.
- Pre-tin your iron: Melt a little blob of solder onto the tip of your iron.
- Placement: Lay the tabbing wire onto the fluxed busbar. Align it perfectly.
- The Anchor: Place your iron at the very top of the wire. Apply gentle pressure. You will see the solder on the pre-tinned wire melt and flow into the busbar. This anchors the wire.
- The Swipe: Now, move the iron down the length of the wire at a steady speed. Not too fast, not too slow.
- Too Fast: The solder doesn't melt fully, creating a "cold joint" (bad connection).
- Too Slow: You overheat the cell, causing it to curve or crack.
- The Trick: Use a piece of cardboard or a wooden stick in your other hand to gently hold the wire down behind the iron as it passes. This keeps the wire from springing up before the solder cools3.
Step 4: The Stress Relief Loop (CRITICAL)
Do not solder the wire all the way to the very edge of the cell. Stop about 2-3mm from the edge.
Why? Because when the panel heats up in the sun, the copper wire expands faster than the silicon cell. If they are soldered tight to the edge, the expanding wire will pull on the edge of the cell and crack it.
- The Fix: When you connect this wire to the next cell, you will leave a tiny little "hump" or loop in the wire between the cells. This acts like a spring or shock absorber for thermal expansion7.
Troubleshooting Your Solder Joint:
- Good: The wire is flat. The solder is shiny and smooth. If you gently tug on the wire, the whole cell moves.
- Bad: The solder looks dull or lumpy. The wire lifts off easily. This is a "Cold Solder Joint." It will cause high resistance, heat up, and eventually burn out your panel. Re-flux and re-flow it16.
---
6. Stringing: Connecting the Dots
Now that you have tabbing wire hanging off the front of all your cells, it’s time to connect them into a chain. This is called "stringing."
The Series Connection
You are connecting the Negative (Front) of Cell #1 to the Positive (Back) of Cell #2.
- Lay Cell #1 and Cell #2 face down on your workspace (or face up, depending on your preferred method, but usually face down is easier for accessing the back).
- Wait, actually: Most people build strings by laying them face down.
- Method: Lay Cell #1 face down.
- Let's walk through the Face Down method:
- Take your cells which already have wires on the front.
- Lay Cell #1 face down.
- Lay Cell #2 face down next to it.
- Take the wires coming from the front of Cell #2 (which are currently trapped underneath it). Carefully guide them so they lay across the back of Cell #1.
- Solder these wires to the white/silver pads on the back of Cell #1.
- Now the Front of #2 is connected to the Back of #1.
- Repeat this until you have a string of 9 cells3.
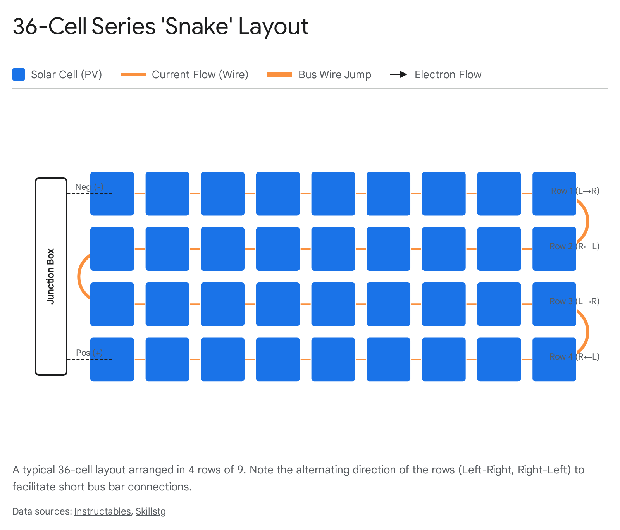
The "Snake" Layout
You need to fit 36 cells onto your rectangular glass. The standard way is 4 rows of 9 cells.
But you can't just lay them all left-to-right. You have to "snake" them to make the wiring easy.
- Row 1: Goes Left to Right (Output is at the Left).
- Row 2: Goes Right to Left.
- Row 3: Goes Left to Right.
- Row 4: Goes Right to Left.
Why? Look at the end of Row 1. It ends on the right. The start of Row 2 is on the right. This means you only need a short little jumper wire to connect them. If Row 2 started on the left, you'd need a long wire running all the way across the panel. We want to avoid long wires because they add resistance7.
Handling the Strings
A string of 9 cells is incredibly flimsy. It’s like a wet noodle made of glass.
- Technique: Never pick it up by the ends. The middle will sag, bend, and snap the cells.
- The Trick: Slide a piece of cardboard or thin plywood underneath the string to move it. Treat it like a pizza going into an oven.
---
7. The Backbone: Glass and Backing
Now we need to mount these strings.
Preparing the Glass
Take your tempered, low-iron glass. Clean it. Then clean it again. Then clean it one more time with alcohol.
Why? Once you glue the cells down, any fingerprint, dog hair, or smudge on the inside of the glass is there forever. It will mock you every time you look at your panel.
Layout
Place the glass on your table. You might want to put a diagram underneath the glass (since it's transparent) to help you align the cells straight.
Carefully transfer your strings onto the glass.
- Spacing: Leave about 2mm to 5mm between the cells. This gap is purely aesthetic but also allows for a little thermal expansion.
- Securing: Use tiny pieces of masking tape or a tiny dab of silicone to tack the cells in place so they don't slide around while you work. Ideally, use a tiny dot of glue in the center of the cell back. Do not tape the front; you don't want tape shadowing your active area5.
---
8. The Bus Highway
Now you have 4 independent strings sitting on the glass. You need to connect them.
This is where the Bus Wire comes in. It’s the wider, thicker wire.
- Connecting Rows: At the end of Row 1, you have tabbing wires sticking out. At the start of Row 2 (which is right next to it because of the snake layout), you also have wires.
- The Bridge: Cut a piece of Bus Wire long enough to span the gap.
- Solder: Solder the tabbing wires from Row 1 onto the Bus Wire. Then solder the tabbing wires from Row 2 onto the same Bus Wire. Now Row 1 flows into Row 2.
- Repeat: Connect Row 2 to Row 3. Connect Row 3 to Row 4.
- The Exits: You now have two loose ends remaining: the very start of Row 1 (Negative) and the very end of Row 4 (Positive). Solder long pieces of Bus Wire to these. These are your "Leads." They need to be long enough to reach your junction box25.
The Mid-Build Test
STOP. Do not pour any glue yet.
Take your multimeter. Set it to DC Volts.
Touch the positive probe to the positive lead and the negative probe to the negative lead.
Even under indoor room lights, you should see voltage (maybe 10V-15V depending on brightness). If you take it outside (carefully!), you should see 18V-21V.
- Zero Volts? You have a short circuit or a broken wire.
- Low Volts (e.g., 9V)? You probably have one entire row disconnected.
- Fix it now. Once you encapsulate, there is no going back. It is entombed forever3.
---
9. Forever Sealed: The Encapsulation Debate
This is the most controversial part of DIY solar. Factory panels use EVA film melted in a vacuum oven. You don't have a vacuum oven. So, what do you use?
Option A: The "Cadillac" Method (Sylgard 184)
This is a liquid silicone elastomer made by Dow Chemical. It is designed for this exact purpose.
- Pros: It is optically perfect, UV stable (won't yellow), and handles heat/cold cycles perfectly. It protects the cells from vibration.
- Cons: It is expensive. A kit might cost $100+. This usually destroys the "money-saving" aspect of DIY, but it guarantees a panel that lasts 20 years.
- How to use: It comes in two parts (Part A and Part B). Mix them gently (don't whip air into it). Pour it over the cells. It self-levels. Let it cure for 24-48 hours20.
Option B: The "Hacker" Method (Silicone + Mineral Spirits)
This is the budget DIY favorite, but it comes with risks.
- The Recipe: Take a tube of clear 100% Silicone Caulk (like GE Silicone II). Mix it with Mineral Spirits (paint thinner).
- Ratio: Roughly 2 parts Silicone to 1 part Spirits (by weight). Or until it flows like warm syrup5.
- The Process: Pour this mixture over the cells. The mineral spirits act as a solvent to thin the silicone so it can be poured. Once poured, the spirits evaporate, leaving the silicone behind.
- The Warning:
- Shrinkage: As the spirits evaporate, the volume decreases. The coating gets thinner.
- Acidity: Some silicones release acetic acid (smells like vinegar) when curing. Acid + Copper Wires = Corrosion. You must use "Neutral Cure" silicone (often used for concrete or mirrors). Avoid anything that smells like vinegar.
- Longevity: This method often yellows after 3-5 years in the sun, which lowers your power output5.
Our Verdict: If you are building a panel for a science fair or a temporary campsite, use the Hacker Method. If you are building a panel to mount on your roof for the next decade, bite the bullet and buy the Sylgard or a specialized "Solar Encapsulant" resin (like QSil 216).
The Pour
Whichever fluid you choose, the technique is the same.
- Ensure the panel is perfectly level.
- Pour slowly. Start in the middle and let it flow outward.
- Bubbles are the Enemy: Bubbles scatter light and create hot spots. If you see bubbles, use a heat gun (on low) or a toothpick to pop them carefully.
- Cover the panel with a large box while it cures to prevent dust from settling in the sticky resin.
---
10. The Exoskeleton: Framing
Your panel is now a heavy slab of glass with delicate electronics glued to it. You need a frame to protect the glass edges and provide a way to mount it.
Material: Aluminum Angle
Go to the hardware store and buy "Aluminum Angle" (L-shaped bar). 1-inch x 1-inch x 1/16-inch thick is standard.
- Why Aluminum? It doesn't rust, it's light, and it's easy to cut.
- Why not Wood? Wood swells when wet. It will rot. It holds moisture against the seals. Just don't.
Assembly
- Cut: Measure your glass sandwich. Cut the aluminum to fit. You can do fancy 45-degree miter cuts if you have a miter saw, or just overlap the corners if you are using a hacksaw.
- Seal: This is vital. Run a bead of silicone sealant inside the aluminum angle before you put it on the glass.
- Press: Press the frame onto the glass. The silicone acts as a shock absorber and a water seal.
- Secure: Use stainless steel screws to join the corners of the aluminum frame together.
- CRITICAL: Do not drill through the glass. Do not screw into the glass. The frame clamps around the glass. The screws only hold the aluminum pieces to each other30.
---
11. The Brain: Junction Boxes and Diodes
Turn the panel over. You have two wires sticking out the back (Positive and Negative). You can't just leave them dangling.
The Junction Box (J-Box)
This is a small waterproof box glued to the back of the panel. It protects the wire connections. You can buy generic waterproof project boxes or specific solar J-boxes.
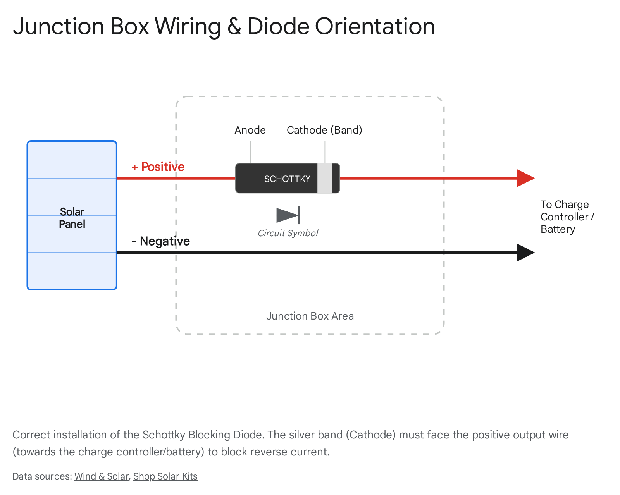
The Schottky Diode (The One-Way Valve)
You must install a "Blocking Diode" inside this box.
- The Problem: At night, your solar panel produces zero volts. Your battery is sitting there at 12.7 volts. Electricity is like water; it flows from high pressure to low pressure. Without protection, the battery will push electricity backwards into the panel. This drains your battery and can overheat the panel.
- The Solution: A Diode. It checks the flow of traffic and only lets it go one way (out of the panel).
- Why Schottky? A standard diode consumes about 0.7 volts just to work. A Schottky diode is more efficient, consuming only about 0.3-0.4 volts. In a low-voltage system, every volt counts.
- Rating: Get a Schottky diode rated for at least 10 Amps and 45 Volts (for a 100W panel)32.
Installation
- Solder the Diode onto the Positive lead inside the junction box.
- Orientation: The diode has a silver or black band on one end. This is the Cathode. The band must face towards the battery (away from the panel). Think of the band as the wall that stops the current coming back.
- Panel Positive -> Diode (Non-Band side) -> Diode (Band side) -> Red Wire to Battery34.
---
12. The Moment of Truth: Testing Your Creation
It is finished. The silicone is cured. The frame is tight. It’s time to take it outside.
Test 1: Open Circuit Voltage (Voc)
- Set your multimeter to DC Volts (200V scale).
- Point the panel at the sun.
- Connect Red probe to Positive, Black to Negative.
- Target: You should see 18V to 22V. This confirms all your cells are connected and generating pressure.
Test 2: Short Circuit Current (Isc)
- Set your multimeter to 10A (Amps). Move the red probe to the 10A socket on the meter.
- Touch the probes to the wires. SPARK! Don't worry, it's safe at this voltage, but it will spark.
- Target: You should see Amps. If you have 6-inch cells, you might see 5 to 8 Amps depending on how bright the sun is.
- Note: Don't hold this for more than a few seconds. It heats up the internal shunt in your meter and the panel wires4.
Troubleshooting Table
| Symptom | Probable Cause | Fix |
|---|---|---|
| 0 Volts | Short circuit or broken wire. | Check junction box connections. If internal, you're in trouble. |
| Half Voltage (~9-10V) | One entire string is disconnected. | Check the bus wire connections at the ends of the rows. |
| Low Amps (in full sun) | Poor solder joints (high resistance) or bad cells. | Check for "cold" solder joints (dull/lumpy solder). |
| Panel gets extremely hot in one spot | Hot Spot. | A cell is cracked or shaded, or a bubble is acting as a lens. |
---
13. Hooking It Up: The System
You cannot plug this solar panel into a wall outlet. You also shouldn't hook it directly to a battery without a brain in the middle.
The Charge Controller
The panel puts out ~18V-21V. A 12V battery explodes if you feed it 21V for too long.
You need a Solar Charge Controller.
- PWM (Pulse Width Modulation): Cheap ($10-$20). It basically chops the voltage down to what the battery needs. It wastes the excess energy. Good for small DIY panels.
- MPPT (Maximum Power Point Tracking): Expensive ($80+). It converts the excess voltage into extra amps. It is 30% more efficient.
- Connection Order:
- Connect Battery to Charge Controller. (The controller needs to wake up and see the battery voltage first).
- Connect Solar Panel to Charge Controller.
- Never connect the solar panel first. You might fry the controller4.
---
14. Conclusion: The Value of "I Made This"
If you track your receipts, you might realize you spent $200 to build a 100-watt panel that you could have bought for $70.
That is not a failure.
You didn't just buy a panel. You bought a masterclass in photovoltaics. You bought the skill to repair a broken system when you are off-grid and Amazon can't deliver. You bought the understanding of why a shadow from a single leaf can kill a whole string's output.
When you look at your DIY panel, you won't just see a shiny rectangle. You'll see the messy silicone you poured, the tabbing wire you painstakingly straightened, and the physics of the universe captured in a frame you screwed together. And when that first charge light turns green? That is a feeling money can't buy.
Now, go find some sun.
---
Glossary for the Solar Builder
- Busbar: The thick lines on the cell that collect power.
- Tabbing Wire: The thin wire you solder to the busbars.
- String: A series of cells connected in a line.
- Voc: Voltage Open Circuit (Max voltage with no load).
- Isc: Current Short Circuit (Max amps with no load).
- Series: Connecting Positive to Negative (Increases Voltage).
- Parallel: Connecting Positive to Positive (Increases Amps).
- Encapsulant: The clear "glue" that seals the panel.
- Flux: The chemical cleaner that lets solder stick.
Works cited
- How Much Do Solar Panels Cost? (2026) | ConsumerAffairs®, accessed January 28, 2026, https://www.consumeraffairs.com/solar-energy/how-much-do-solar-panels-cost.html
- Solar Panel Cost In 2026: It May Be Lower Than You Think | EnergySage, accessed January 28, 2026, https://www.energysage.com/local-data/solar-panel-cost/
- How to Make Your Own Solar Panels in 10 Easy Steps - CNET, accessed January 28, 2026, https://www.cnet.com/home/solar/how-to-make-a-solar-panel/
- How to Build a Homemade Solar Panel From Scratch - YouTube, accessed January 28, 2026, https://www.youtube.com/watch?v=mvORZvd3QsM&vl=en-US
- encapsulation of solar cells - NAZ Solar Electric Forum, accessed January 28, 2026, https://forum.solar-electric.com/discussion/8866/encapsulation-of-solar-cells
- Buy monocrystalline solar modules - pvXchange.com, accessed January 28, 2026, https://www.pvxchange.com/Solar-Modules/Monocrystalline
- How to Build a Solar Panel : 9 Steps (with Pictures) - Instructables, accessed January 28, 2026, https://www.instructables.com/How-To-Build-A-Solar-Panel/
- Solar Panel Tabbing Wire Kit - 125 Ft Tabbing Wire + 10 Ft Bus Wire With Flux Pen & Diodes, accessed January 28, 2026, https://www.pfhlogistica.com/Solar-Panel-Tabbing-Wire-Kit-125-Ft-Tabbing-Wire-10-Ft-Bus-249220
- 40 solar cells kit 5.7watt Effi 22.6% monocrystalline+ tabbing wires 1.00mm diy | eBay, accessed January 28, 2026, https://www.ebay.com/itm/356563042425
- How to make a Solar Panel - Wiring, Soldering, and Cell Layout - Explained Simply!, accessed January 28, 2026, https://www.youtube.com/watch?v=ybvP8vjv1UY
- Tabbing +bus wire DIY kit solar cells solar panels for 1x3-2x3-3x3 size cells | eBay, accessed January 28, 2026, https://www.ebay.com/itm/170773282240
- Photovoltaic Solar Tabbing Wire - Ulbrich Stainless Steels & Special Metals, Inc., accessed January 28, 2026, https://www.ulbrich.com/products/pv-ribbon-wire/tabbing-wire/
- Copper flat wire - solar tabbing strip bus wire - Full Battery, accessed January 28, 2026, https://fullbattery.com/products/copper-flat-wire-solar-tabbing-strip-bus-wire
- Homemade 63 Watt Solar Panel : 5 Steps - Instructables, accessed January 28, 2026, https://www.instructables.com/Homemade-63-Watt-Solar-Panel/
- DIY Solar Panel: A step-by-step how-to guide - Engineering For Change, accessed January 28, 2026, https://www.engineeringforchange.org/news/diy-solar-panel-step-step-guide/
- Hand Soldering Recommendations for Solar Module Assembly - Indium Corporation, accessed January 28, 2026, https://www.indium.com/blog/hand-soldering-recommendations-for-solar-module-assembly/
- DIY Solar Panels - materials? — northernarizona-windandsun, accessed January 28, 2026, https://forum.solar-electric.com/discussion/1608/diy-solar-panels-materials
- Low Iron Flat Glass 4MM in USA | Behrenberg Glass Co, accessed January 28, 2026, https://www.behrenbergglass.com/Flat-Clear-4-MM-532-Low-Iron-Glass_c_221.html
- Square/Rectangle 3/8" Thickness Low Iron Tempered Glass, accessed January 28, 2026, https://www.onedayglass.com/our-products/square-rectangle-3-8-thickness-low-iron-tempered-glass/
- SYLGARD™ 184 Silicone Elastomer Kit - Dow Inc., accessed January 28, 2026, https://www.dow.com/en-us/pdp.sylgard-184-silicone-elastomer-kit.01064291z.html
- Which encapsulant is best - Solar Panel Talk, accessed January 28, 2026, https://www.solarpaneltalk.com/forum/diy-solar-panels/diy-solar-panels-aa/17428-which-encapsulant-is-best
- Tabbing hints for solar cells - Solar Panel Talk, accessed January 28, 2026, https://www.solarpaneltalk.com/forum/diy-solar-panels/assembly-and-connection/9890-tabbing-hints-for-solar-cells
- How to solder tabbing wire to the back of a solar cell - Part 1 - YouTube, accessed January 28, 2026, https://www.youtube.com/watch?v=7aguEAFjqPs
- How to Solder Solar Cells Together : 6 Steps (with Pictures) - Instructables, accessed January 28, 2026, https://www.instructables.com/How-to-Solder-Solar-Cells-Together/
- How To Build A Photovoltaic Solar Panel [9 Easy Steps] - Skills Training Group, accessed January 28, 2026, https://www.skillstg.co.uk/blog/how-to-build-a-photovoltaic-solar-panel/
- [the real post] Solar Panel Encapsulation, accessed January 28, 2026, https://www.solarpaneltalk.com/forum/diy-solar-panels/diy-solar-panels-aa/1451-the-real-post-solar-panel-encapsulation
- Sylgard, Qsil and others prices gone through the roof - Experimental - Formlabs Forum, accessed January 28, 2026, https://forum.formlabs.com/t/sylgard-qsil-and-others-prices-gone-through-the-roof/21843
- Cheap methods of encapsulating? - Solar Panel Talk, accessed January 28, 2026, https://www.solarpaneltalk.com/forum/diy-solar-panels/assembly-and-connection/1163-cheap-methods-of-encapsulating?view=stream&p=43856
- Silicone sealant | Page 2 - DIY Solar Power Forum, accessed January 28, 2026, https://diysolarforum.com/threads/silicone-sealant.36943/page-2
- Solar Panel Mounting Frame : 3 Steps - Instructables, accessed January 28, 2026, https://www.instructables.com/Solar-Panel-Mounting-Frame/
- Building a Solar Panel – Constructing an Aluminum Frame, accessed January 28, 2026, https://www.solarpaneltalk.com/forum/solar-thermal/solar-water-heating-forum/22197-building-a-solar-panel-%C3%82%E2%80%93-constructing-an-aluminum-frame
- How to Install a Blocking Diode - Missouri Wind and Solar, accessed January 28, 2026, https://windandsolar.com/blogs/wiring-diagrams/how-to-install-a-blocking-diode
- BLOCKING DIODE INSTALLATION INSTRUCTIONS - Marlec, accessed January 28, 2026, https://www.marlec.co.uk/wp-content/uploads/2014/03/Blocking-Diode-Instructions.pdf
- How to Connect Diode to Solar Panels (diode Types & how to Connect Them) - ShopSolar, accessed January 28, 2026, https://shopsolarkits.com/blogs/learning-center/how-to-connect-diode-to-solar-panel